Welcome to Cold War Gamer, a blog I am using to record my Cold War wargaming projects. These range from fictitious Cold War hot projects to historical conflicts that took place around the globe throughout the Cold War era, all modelled and gamed in 20mm. The blog includes links to various resources useful to the Cold War Gamer.

My current projects include: Central Front; British & Soviet. South African Border War; Angolans and South Africans. Soviet Afghan War; Soviets and Afghans

Saturday 29 September 2012

Review - Model, A Models 1/72 Mi 6 Hook


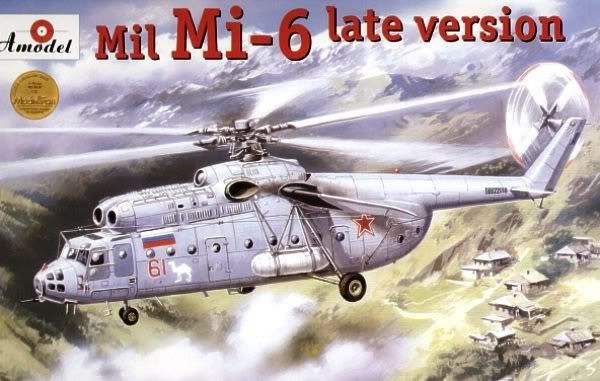
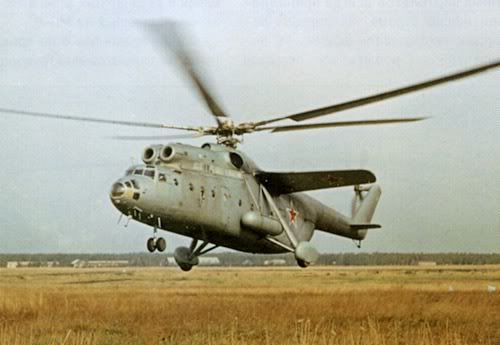
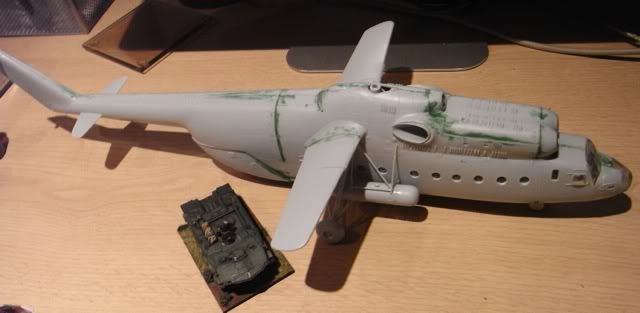
The Mi-6 entered service with the Soviet Armed forces in 1960 and set some impressive records from the moment it started flying mostly associated with being big heavy, fast and a Helicopter.  It remained the mainstay of the Aviation Heavy lift capability until the arrival of the Mi 26 in the 1980's but remains in service today.  Some 500+ were built and these were used in the Frontal Helicopter Transport Regiment.  The carrying capacity of the beast allows it to carry one BMD or a variety of light trucks and support weapons or a 70-100 men.


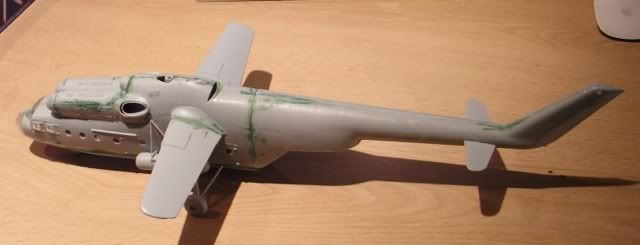
The model is produced by A Models a firm of Eastern European origin with the usual caveats that come with products from that space - Great models when they are built, building them can be fun and this one is no exception.  The Kit is massive measuring some 43 cm in length.  I usually leave all the internal components out of my aircraft and paint out the windows but in this case some of those internal components provide essential structural strength to the model.


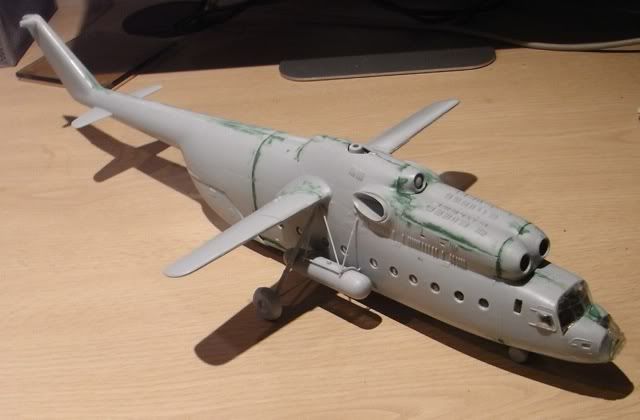
Form and fit of parts was generally good, the crux of putting this kit together hinged around fitting the cabin roof, forward bulk head and the floor into the left and right side aircraft hulls and tail sections, This involved considerable pairing and filing of the roof and floor sections.  Without these components  the model would probably flex too much to stay together for any period of time.


Once you have achieved a fit the gluing of the components together needs to be done in stages.  I located the bulk head floor and ceiling to the right hull and let it cure overnight before attempting the rigerous filing and pairing to achieve fit with the left hull side.  I then glued and held the hull sections around the engines using tape and clamps and left to set before repeating the process for the nose section  and lower hull.  This approach allows the hull to be forced into a fit position as the large and relatively thin sections of the hull allow considerable flex from the natural position they are presented in.


Once you have that cracked the remainder of the assembly is straight forward, given the weight of the model it is important to give the glue time to set on the landing gear before standing the aircraft on its own feet.  I Intend to field all my Helicopters for the Soviets without rotor blades or disks as they break easily and take up a lot of space on the battlefield so I have not fitted the aircraft with any.


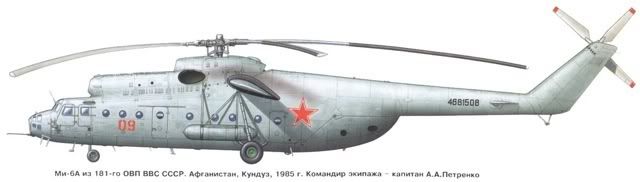
I have yet to find any images of aircraft other than in light Grey schemes as shown below But I am still in the process of researching this prior to painting the beast up


The end result is a great looking representation of this impressive aircraft.  I intend to use mine as part of the Front Helicopter Transport Regiment's heavy lift squadron along with a number of Mi 26s being built as I write.

References:

Global Security MI 6 Pages
Wings Palette - Mi 6 Markings
All The Worlds Rotorcraft - Mi 6

Friday 21 September 2012

ORBAT - Soviet Task Org, Fronts in the Western TVD


In considering the development of War Games scenarios for the cold war a few context elements are requiered in order to be able to consistently develop them in a logical way that allows the war gamer to create realistic task organisations at the level of play. My principal area of interest is NATO Brigade or Soviet Regiment and below. The easy way to do this are to use the unit peacetime Orbats, in both NATO and the Warsaw Pact there was specific mission orientated force tailoring that went on and for the Soviets in particular this could be significant when looking at the Regiment or Battalion in the context of the Divisional, Army and Front level operations.


In adding the extra bits it's difficult to justify the composition without some level of definition of the high level plan, through developing a high level plan for both sides you can quickly start to develop a number of scenarios in a linked campaign in which the force structures for each side, for each engagement are logical within the wider operational and force context. I find that it also stimulates the thinking around different types of organisation and games specifically when there are no historical events around which to base the scenario development.


This post will aim to set out the structure of the Fronts in the Western TVD that I will then use to drive the overarching campaign context for a series of linked scenarios set in different parts of NATOs Central Front.

Victor Suverov in his book inside the Soviet Army, proposed in part 3 Combat Organisation, that the peacetime deployment of forces in the Western TVD did not represent the structure of the force that would appear and this basic tennent is reinforced in a number of other sources. Suverov went onto suggest that:
  • A Soviet front has a clear structure essentially two combined arms armies, a tank army and an air army, along with a variety of supporting units and sub units.
  • Units of the Warsaw Pact would be incorporated in detail into the structure of the Soviet commands below army level. The numbers suggest that this would be at Army level and below ie: some Armies would only contain Warsaw Pact Allied units particularly with CGF and the CSLA and NGF and the PPA.  
  • His analysis of the forces available within GSFG, CGF, NGF and the Russian MDs of the Western TVD including those of the Warsawpacts CSLA, NVA, and PPA suggested that they contained sufficient force to create 4 Fronts and a Group of Tank Armies.  Where 3 Fronts would sit in the first echelon and 1 in the second.
  • He asserted that in order to acheive this some redeployment of Divisions Units and HQs would be requiered.


This has always made a degree of sence, particularly given the level of effort the Soviets always went through to decieve there enemies, It was logical that the Army and Front structures observed in East Germany were unlikely to be what we would fight.  Some High level analysis of the units available demonstrates that his concepts were indeed feasible with minimal additions from the MDs of the Soviet Union within the Western TVD.


For my Scenarios I intend to represent a Front containing 2 CAA, 1 TA and an Air Army, with a subordinate Army structure for:

 CAA's as:
  • 4 MRD
  • 1 TD 
TA's as 4TD.

This is more structured than what was seen on the ground in GSFG and CGF and represented by the TO&Es presented by the US FM 100 series of manuals. Ultimately it makes Scenario design a lot easier and seems to fit the Soviet way of doing buisness passing units between the echelons within an organisation and supporting forward from the higher formation assets determined by the mission need and the definition of the principal axis of advance.


For my Scenarios in Southern Germany I have organised the Central Group of Forces into a single unified front of two combined armies and a tank army as follows:

22 CAA (Soviet)
  • 30 Gds MRD
  • 18 Gds MRD
  • 48 MRD
  • 15 CSLA MRD
  • 31 TD
4 CSLA CAA
  • 2 CSLA MRD
  • 19 CSLA MRD
  • 20 CSLA MRD
  • 3 CSLA MRD
  • 1 CSLA TD 
1 CSLA TA
  • 15 TD (Soviet)
  • 4 CSLA TD
  • 9 CSLA TD
  • 13 CSLA TD (T-55)

In respect of the supporting troops my general assumption is that these are deployed as represented in FM 100-2-3.


Given The way Soviet Artillery, Engineering, Anti-tank capability and reserves of Armour, Aviation and Air Assault units were allocated from front to Army to Division and the manor in which Forward detachments were task organised and deployed I find that some understanding of where the Front was going and what it was unto helps to structure my thinking for Scenarios and put some context on the very wide scope for task organisation which existed within elements of the force on the main effort between the echelons or when representing exploitation forces such as Operational Manoeuvre groups.

GSFG can be similarly structured into Two Fronts around five balanced Soviet Armies reorganised in line with Suverov's assertion and an Army formed from the NVA each consisting of two CAA and 1 TA.  With the broad outline of the supporting elements again reflecting Fm 100-2


I have not examined the NGF nor the Western Military Districts in detail yet as the scenarios I am currently interested in creating would involve NATO forces from Canada, Germany and Britain and the bulk of that action sits either on the North German Plain, or on the Southern flank of CENTAG on the boundary between II Ge Corps Area and XX US Corps.

The interesting part of this exercises is that whilst the numbers quoted in Suverovs book don't add up, when that evidence itself is examined the theory seems highly plausible. Which just leaves the T-64, T-72, T-80 debate to resolve.


Warsaw Pact Orbat 1988
FM 100-2 Specialised Warfare and Rear Area Support, Chapter 3 Heliborn Operations
FM 100-3, Soviet Troop Organisation and Equipment
Weapons and Tactics of the Soviet Army, Isbey, 1988
The Third World War, August 1985: A Future History
The Soviet Conduct of Tactical Maneuver: Spearhead of the Offensive
Inside the Soviet Army

Saturday 15 September 2012

Terrain - Hikki Trees, Pine Forests


The draw back about wanting to use T-72s in your Soviet Force is that your main opportunity lies with the Central Group of forces and there likely invasion routes took the deep into Southern Germany and that means fighting in Bavaria which in turn means Forests and hills. To be fair most of Germany is a large pine forest. So a decent heap of Pine trees is key to fighting on the Central front.


Tools for terrain making are always bigger than those used for other tasks, these three I consider to be essential. The jigsaw allows me to create decent terrain bases from either hard board or MDF, the electric sander is essential to tidying up the resultant bases and a drill with a range of medium to large size bits ensures you can deal with the most difficult of modern trees. In addition for building woods I use a hot glue gun and a range of large flat brushes.


I found these the other day Hikki 40mm - 100mm Pine trees 100 in total for £30 how wrong could it go. they arrived densely packed in a very uninspiring plastic bag, which once I had emptied it turned out to contain 103 trees of sizes, 150mm, 100mm, 75mm and 50mm.  Note the tree ends in a very unfriendly stump to use these  you need to build bases and drill holes, having said that they were cheap.


I decided to base them in either threes or fives and set about creating the 24 bases it would take to mount them from MDF and Hard Board.  


Base creation is a simple two step process, cut out some irregular shapes, chamfer the edges with the sander then round off the corners, ensuring that your wearing a suitable mask whilst your doing it to avoid the harmful effects of inhaling small fibrous particles. Then its down to finding an appropriate size drill bit and drilling out the holes for the trees, which then get filled with hot glue prior to planting, much easier than gardening.  


The bases are then coated with white glue and sand before painting.  Painting is done with kids liquid poster colours in a range of browns using some big brushes.  Then the bases are  dressed with more white glue and a range of scatter materials.


End result looks like this 24 bases of either 3 or 5 trees and a few left over for the odd back garden


Whilst this post took a relatively short time to write the trees took the best part of three weekends to complete, the cost was low and they are relatively effective and bulk out my pine tree collection nicely. They started a terrain frenzy which lasted from late May to early August, so more on Terrain Items to follow.  The critical point to remember when doing trees is that it is very difficult to have too many.


Other Terrain related posts include: 


Wednesday 12 September 2012

Web Resources - Fire and Fury, Cold War Orbats & Modern Resources


Fire and Furry is a games website covering 2 Rules Systems, Fire and Furry and Battlefront World War 2.  What makes the site a phenominal resource is the ammount of suplimental material produced for the Battlefront set in the Modern Period this includes:
The Orbats are what first attracted my eye they have a very consistent structure and style and are visually appealing which makes them easy to use.  The Orbats are relativly easy to work back to the real world organisations or translate to other approaches to unit representations. Clearly there are generalisations applied for the rule set in question but this can be refined by following up with your own research or through purchasing lists from other sources such as MicroMark @ Wargames Vault.

For the Cold War gammer they cover all the main central front players extensively with some excellent research sitting behind the products.  In addition a significant number of the surrogate wars are covered including the Ogeden, The South African Bush War, Granada, the Falklands and the Arab Israeli Wars. I have used these on Numerous occasions but keep forgetting they are there.  It is the very best of start points for working out Orbats for the Cold War Period and the lists are revised and updated as new information comes to light. Just what the internet was made for really, sharing :)

Cold War Orbats covered include:

Warsaw Pact - Soviet, East German, Polish, Czech, Hungarian, Bulgarian and Romanian
NATO - British, US, West German, Canadian, Belgian, Netherlands, Danish, Norwegian, Greek, Turkish, Italian, Spanish, Portuguese and French


Saturday 8 September 2012

Modelling -Scratch Build, 20mm Milan Firing Posts


In 1981 Soviet tanks attacking a British Infantry Battalion in Germany would have been confronted by this, which would have scared me if I had been the British Gunner.  The Wombat was replaced by Milan as the principal Anti Armour weapon of the British armed forces in the early 80's having been fielded by the Germans and French in the lates 70's.  It saw service in the Falklands and both Gulf Wars before being replaced by Javalin in Mid 2005.


Milan is a SACLOS wire guided system with a range of 1850m.  It was updated with the MIRA thermal imaging system in the mid eighties (assumed, I have not been able to identify a date for the introduction of this upgrade),which provided the first thermal imager into most British infantry battalions.  Initially battalions deployed 12 firing posts, moving to 24 in the mid to late 80s. liberation Miniatures, S&S and Elhiem all currently do a milan system in 20mm. I however decided to scratch build mine using card stock and these pictures as a guide.


The key thing for me when approaching a task like this is that you can tell what it is when its done and it looks allright. So I am not really one for measuring anything although in this instance because I wanted 4 I did need to achieve some level of consistency.


I used missile tubes produced by liberation for their TOW system as the launch tubes although I could equally have used some plastic rod.  The remaining component were all cut from plasticard strips of different thickness and widths.


The three elements of the launcher were then constructed with the tripod being built onto a thin plasticard base to give it strength and ease attachment to the figure base later.  The launch unit consisting of the launch rail the flash guard and site unit were shaped and assembled and then attached to the tripods, Finally a representation of the MIRA thermal site was fashioned and the launch tubes added.


The figures were from a mix of sources SHQ SS, liberation legs and Britania crew commanders, with the various components being joined together with greenstuff webbing and based on 20mm wooden circular bases.


Bases were then covered in sand and the figures painted DPM in line with the tutorial referenced below.  Missile launchers were painted with Russian uniform, highlighted by introducing buff and then had a representation of the various stencilled markings on the launch tubes added in white and yellow.


Whilst the modelling is really quite crude with little small detail the painting and scale means that the representation is fairly effective even at close quarters.  As viewed on the table they do the job well.  In total I produced 4 acheiving a good degree of consistency primarily due to the use of cardstck and the creation of simple shapes.


As I write this Matt at Elhiem figures is putting a MIRA on his Millan and creating a British Crew set so less effort required in the future.  Having said that if you have not tried it scratchbuilding isn't that difficult and when you can add something thats not commercially available, builds a better army - so give it a go.  The key thing to remember is the brain is very good at filling in the missing detail.

References:

ORBAT - 1980's British BG, Part 7 The Infantry Battalion
Wargames Unit - 1980's British BG, Support Company
Painting - British Army, DPM
Encyclopedia of The Modern British Army,3rd Edition,Terry Gander